SentinelONE ?

머신러닝 기반의 차세대 EDR 솔루션인 센티넬원(SentinelOne)은 실시간으로 악성파일 및 행위를 차단 하고

사고 분석을 위한 포렌직 기능을 통해 엔드포인트를 외부 공격으로 부터 보호하는 엔드포인트 통합 보안 솔루션입니다.

삼성SDS에서 대규모로 투자하여 보안업계에서는 이슈가 되기도 했습니다.


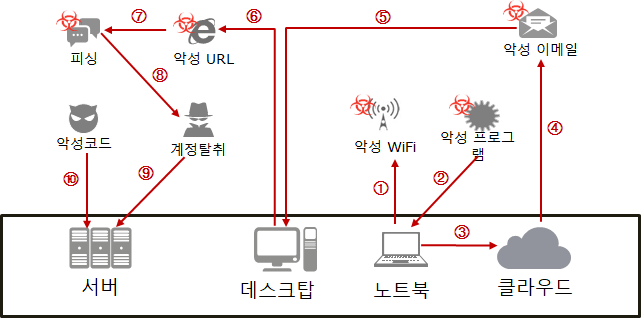
엔드포인트란 네트워크 끝 단에서 실제 사용자가 관리하거나 사용하는 단말 및 디바이스를 이야기 하며 기업의 내부의 데이터, 잠재적으로 전체 비즈니스에 진입하게 되는 지점입니다. 외부의 공격, 악성 이메일 및 url, 내/외부자들의 저장매체 등을 통한 다양한 침투 경로를 통해 악성행위가 실제로 발생되는 곳이며, 해커가 표적으로 하는 최종 목적지이자 보안의 최종 방어선이라고 할 수 있습니다.


해커들의 공격에 대응하지 못해 이 방어선이 무너지게 되면 공격자는 침해된 엔트포인트를 통해 네트워크에서 활동할 수 있는 발판을 확보하고 데이터나 주요자산을 취득하여 결과적으로 기업에게 막대한 피해를 가져오게됩니다.


엔드포인트를 경유하는 침해 시나리오


Zeroday 공격, File-less 공격에 대한 위협 증가

신/변종 악성코드는 기존의 악성코드를 자동화된 툴로 변종을 생성해내어 시그니처 기반의 백신을 무력화 시키기 때문에 시그니처 생성 속도가 악성코드 생성의 속도를 따라갈 수 없고, 이에 대한 대응 속도가 느릴 수 밖에 없습니다.

스크립트 및 메모리공격 등 악성코드가 HDD등에 파일이 없는 Fileless 형태의 공격은 파일 검사 기반의 백신을 우회 할 수 있습니다.

따라서 최신 패치를 설치하고 바이러스 백신 업데이트를 통해 주의를 기울여도 여전히 알려지지 않은 새로운 위협에 대한 위험은 존재하며, 기존의 백신의 탐지/치료 방식은 한계가 존재합니다.

Sentinel ONE Logo

기존 백신 솔루션으로는 진화하는 사이버 공격에 대응하기 어려우며, 실제 기업의 보안 담당자들도 이 한계점을 인지하고 있습니다.

차세대 EDR 솔루션 센티넬원(Sentinel One)은 머신러닝 기술을 기반으로 악성코드 유형을 학습하여 신/변종 악성코드와 공격을 탐지하고 실시간으로 대응하며, 악성코드 탐지 및 차단 대응이 이뤄진 후 발생된 행위에 대한 분석을 지원하여 여러 유형의 공격에 대한 탐지율을 높이고 자동 대응을 통해 운영 인력에 대한 효율을 높일 수 있습니다.


센티넬원은 악성파일 및 행위를 사전 차단 하는 EPP(Endpoint Protection Platform)의 기능과 사후 대응 및 사고 분석을 위한 포렌직 기능을 하는 EDR(Endpoint Detection & Response) 기능을 지원하는 통합 솔루션입니다.


Sentinel ONE 엔드포인트 보안 범위

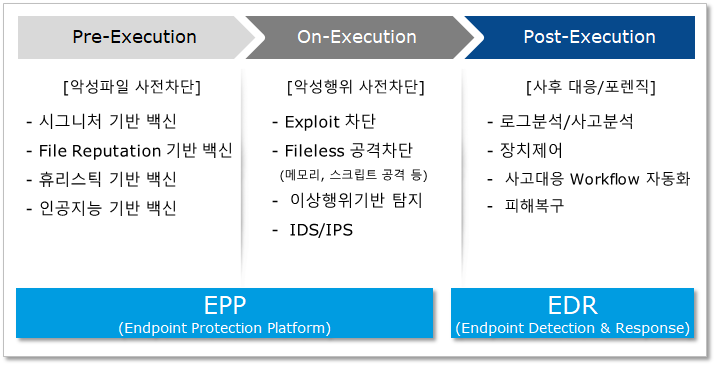
악성파일 사전 차단의 단계에서는 악성코드가 실행되기 전에 시그니처 기반의 백신 및 평판조회를 통한 차단, 인공지능을 기반으로 학습된 파일 패턴 분석 등을 통해 사전 차단이 이뤄집니다.

악성행위 사전 차단 단계에서는 악성코드가 실행되고 있을 시에 시그니처 기반 백신에서 차단하기 어려운 Exploit, File-less 공격 및 이상행위 를 차단합니다.


차단이 된 후 EDR은 악성코드가 감염되었을 시 감염되기 이전으로 복구하는 사후 대응과 내부 네트워크 어디까지 감염이 진행되었으며, 내부의 어떤 pc가 더 감염되어 있는 지 정보를 제공하는 사고대응 Workflow자동화 기능을 제공합니다.

또한 감염 전후의 상황을 알 수 있는 엔드포인트의 이벤트를 모두 수집하여 확인 할 수 있는 로그분석/ 사고분석 기능을 제공합니다.


EDR 도입 시 기대효과


SentinelONE 센티넬원 강점

● 악성코드 및 해킹 탐지를 위한 독자적 AI 기술 보유

- R&D 인력 대부분 Data Scientist 및 악성코드 분석가로 구성

- AV TEST 테스트 결과 최우수 평가

- 파일 정적(Static) 분석 및 행위(Behavior) 기반 AI 기술 모두 보유

● 랜섬웨어 등에 의한 데이터 피해 자동복구 (EDR 솔루션 중 유일)

- ‘18년 데이터 자동복구 기술 특허 획득

● Light-Agent 방식으로 Endpoint 성능 부하를 최소화하는 구조

- 로컬에서 초기 분석 진행, 상세분석은 분석서버/클라우드에서 진행

●Cloud, On-Premise, Hybrid 모두 지원


출처 : https://m.blog.naver.com/PostView.nhn?blogId=huevertech_solution&logNo=221658953010&targetKeyword=&targetRecommendationCode=1

 DNS Configuration

 * 네트워크 속성 > 어댑터 속성 > IPv4 Properties


 DNS 서버 IP를 Local 서버 IP 로 변경


AD 설치

* 서버 관리자(Server Manager) > 대시보드(Dashboard) > 역할 추가(Add roles and features)


도메인 컨트롤러 승격(Promote this server to a domain controller)

* Alert 아이콘 > Promote this server to a domain controller 


출처 https://gamesir.hk/pages/x1-tutorial


IOS Users

Chapter 1. Happy Chick Emulator 및 게임 다운로드 하기

iPhone 7.0 이상의 버전 및 블루투스 가 켜져 있어야 합니다. 그리고 본 내용은 Gamesir X1 을 기반으로 합니다.

Video tutorials:

Step 1.  Happy Chick Emulator 설치


Step 2. Happy Chick Emulator를 통해 게임 설치


Chapter 2. GameSir X1 연결하기

  1. 짧게 Gameir X1의 mode-switch 버튼을 클릭하여 활성화 합니다. 블루투스 연결 대기 상징하는 곳에 불이 들어오면, 핸드폰에서 블루투스 장치를 찾아 연결합니다.
  2. 다운로드 받은 게임을 실행하면, 좌측 상단 코너에 파란색 아이콘을 찾을 수 있습니다. 해당 아이콘을 통해 게임패드 및 연결 관리가 가능합니다.


Chapter 3. Button 설정하기

  1. Gamesir X1이 연결된 이후, 초기에 설정된 버튼의 위치를 사용자가 원하는 대로 변경 할 수 있습니다. 설정 후, USB1/USB2 포트에 키보드 마우스를 꽂고 게임을 즐기면 됩니다.
  2. If you want to make your own button configuration, short-press the mode-switch button of GameSir X1 to recall the button setting menu. Use your finger to drag and place the buttons to where you want it to be on the screen, press the home button of GameSir X1 again to save and close the menu, then you are all set with the new button configuration!
  3. In button setting menu, you may tap any floating button to make advanced settings on them.

Android Users

Step 1. Set-Up

*The latest GameSir World App includes the G-Engine Technology that no longer requires a remapper before launching the game. 

Make sure you installed the last version of GameSir World app HERE. Do not download it from Google Play Store because it is currently outdated.

  1. Please go to Settings > System > About, tap "Build number" 7 times in a raw to turn "Developer options" on.
  2. Go to Settings > System > Developer options and turn "Allow USB debug" on.
  3. Go to Settings > Application > GameSir World and turn all permissions of GameSir World on (camera, location, phone, and storage).
  4. Also turn "Float window permission" on (name might vary, technically it is a permission to allow the app appear on the top of the screen).
  5. Back to the home screen, go to GameSir World APP and navigate to GameSir Spirit interface.
  6. Tap "Connect" button on the top to automatically search and connect to the GameSir X1. 
  7. Tap "+" to add your favorite games to the list.
  8. Tap the game icon and select "Direct Play by G-Engine".
  9. Wait for 1 mins to initialize the game, and you are good to enter the game.  

Step 2. Button Configuring

Only the games selected by GameSir have the preset button configuration. Make sure that you must play the game through GameSir World app or the Gamepad support will not work. 

  1. Tap the game icon at GameSir Spirit interface and go to the game.
  2. Once GameSir X1 was connected to the game, you may now see the floating buttons have been automatically configured on the game interface. Insert keyboard and mouse to the USB1/USB2 ports, the GameSir X1 is now good to control the game!
  3. If you want to make your own button configuration, short-press the mode-switch button of GameSir X1 to recall the button setting menu. Use your finger to drag and place the buttons to where you want it to be on the screen, press the home button of GameSir X1 again to save and close the menu, then you are all set with the new button configuration!
  4. In button setting menu, you may tap any floating button to make advanced settings on them.


+ Recent posts