출처 https://gamesir.hk/pages/x1-tutorial
IOS Users
Chapter 1. Happy Chick Emulator 및 게임 다운로드 하기
iPhone 7.0 이상의 버전 및 블루투스 가 켜져 있어야 합니다. 그리고 본 내용은 Gamesir X1 을 기반으로 합니다.
Video tutorials:
Step 1. Happy Chick Emulator 설치
Step 2. Happy Chick Emulator를 통해 게임 설치
Chapter 2. GameSir X1 연결하기
- 짧게 Gameir X1의 mode-switch 버튼을 클릭하여 활성화 합니다. 블루투스 연결 대기 상징하는 곳에 불이 들어오면, 핸드폰에서 블루투스 장치를 찾아 연결합니다.

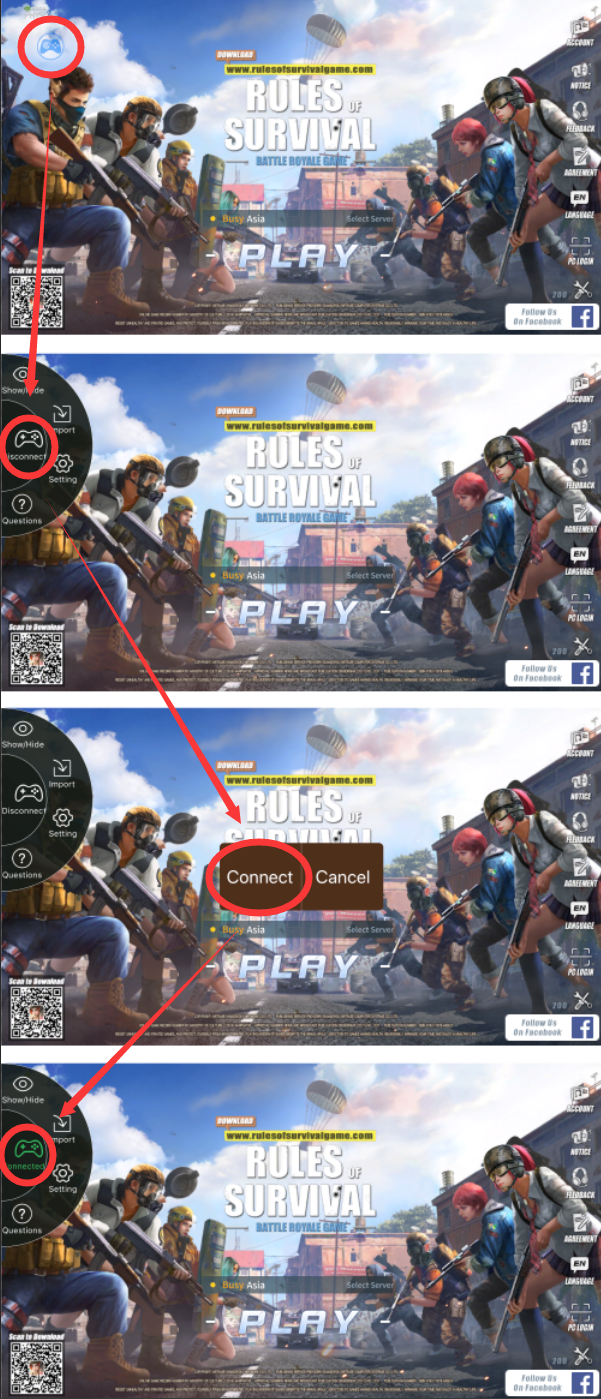
- 다운로드 받은 게임을 실행하면, 좌측 상단 코너에 파란색 아이콘을 찾을 수 있습니다. 해당 아이콘을 통해 게임패드 및 연결 관리가 가능합니다.

Chapter 3. Button 설정하기
- Gamesir X1이 연결된 이후, 초기에 설정된 버튼의 위치를 사용자가 원하는 대로 변경 할 수 있습니다. 설정 후, USB1/USB2 포트에 키보드 마우스를 꽂고 게임을 즐기면 됩니다.
- If you want to make your own button configuration, short-press the mode-switch button of GameSir X1 to recall the button setting menu. Use your finger to drag and place the buttons to where you want it to be on the screen, press the home button of GameSir X1 again to save and close the menu, then you are all set with the new button configuration!
- In button setting menu, you may tap any floating button to make advanced settings on them.
Android Users
Step 1. Set-Up
*The latest GameSir World App includes the G-Engine Technology that no longer requires a remapper before launching the game.
Make sure you installed the last version of GameSir World app HERE. Do not download it from Google Play Store because it is currently outdated.
- Please go to Settings > System > About, tap "Build number" 7 times in a raw to turn "Developer options" on.
- Go to Settings > System > Developer options and turn "Allow USB debug" on.
- Go to Settings > Application > GameSir World and turn all permissions of GameSir World on (camera, location, phone, and storage).
- Also turn "Float window permission" on (name might vary, technically it is a permission to allow the app appear on the top of the screen).
- Back to the home screen, go to GameSir World APP and navigate to GameSir Spirit interface.
- Tap "Connect" button on the top to automatically search and connect to the GameSir X1.
- Tap "+" to add your favorite games to the list.
- Tap the game icon and select "Direct Play by G-Engine".
- Wait for 1 mins to initialize the game, and you are good to enter the game.
Step 2. Button Configuring
Only the games selected by GameSir have the preset button configuration. Make sure that you must play the game through GameSir World app or the Gamepad support will not work.
- Tap the game icon at GameSir Spirit interface and go to the game.

- Once GameSir X1 was connected to the game, you may now see the floating buttons have been automatically configured on the game interface. Insert keyboard and mouse to the USB1/USB2 ports, the GameSir X1 is now good to control the game!
- If you want to make your own button configuration, short-press the mode-switch button of GameSir X1 to recall the button setting menu. Use your finger to drag and place the buttons to where you want it to be on the screen, press the home button of GameSir X1 again to save and close the menu, then you are all set with the new button configuration!
- In button setting menu, you may tap any floating button to make advanced settings on them.
'저장소' 카테고리의 다른 글
| 검은사막 KPM(Kill Per Minutes) 계산기(분당 킬수 계산기) (0) | 2018.03.20 |
|---|


